The migration process from one Mindbreeze appliance to another can be a daunting task especially if you have a lot of indices, data sources, and Talend Jobs to copy over. This usually means exporting the configuration of one object at a time and then importing it into the new appliance, copying over any specific files necessary, and then hoping you didn’t forget something along the way. Thankfully, Mindbreeze has recently added some new functionality which can take a migration process of exporting, copying, pasting, and importing from hours to just 15 minutes with only a few clicks.
In the 21.1 release of Mindbreeze, a new feature called “Snapshots” was added that can be used to migrate your entire configuration, including any dependent files from the file system, in a single export. Fishbowl Solutions highly recommends that anyone looking to do a migration update their appliance to the 21.1 version (or newer) to take advantage of this new functionality. In this article, I’ll walk through the entire process of creating, exporting, uploading, and applying a Snapshot to give you a feel for how easy this process is.
First, we need to create a Snapshot in the exporting appliance:
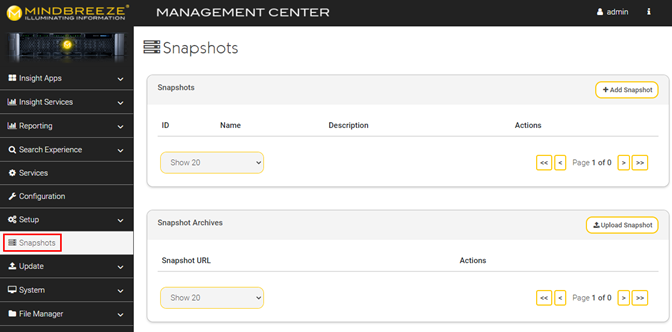
- Log into the Mindbreeze Management Center for the appliance that you wish to export from.
- On the left-hand navigation, click on the “Snapshot” menu.

3. In the “Snapshots” section, click the “+ Add Snapshot” button on the right-hand side of this page.

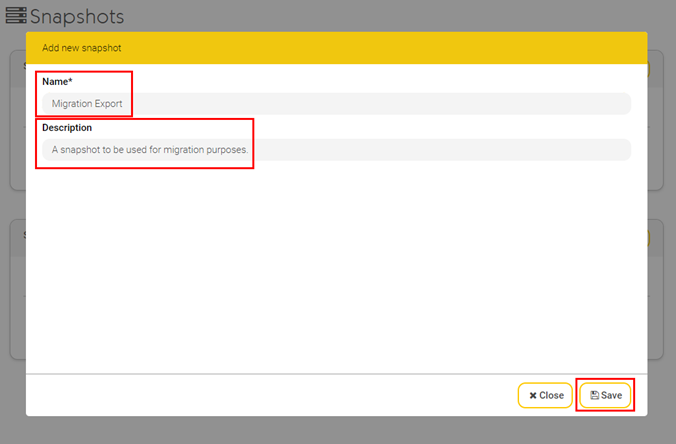
4. In the “Add new Snapshot” window, provide a name and description for the Snapshot and then click “Save.”

NOTE: After clicking the “Save” button it will take a moment for the system to generate the Snapshot. Please be patient.
5. Now that your Snapshot has been created, you will now need generate an “Archive” to download. Click the “Archive” button on the line of your newly created Snapshot.

6. There should now be a Snapshot “Archive” listed at the bottom of this page. This is what you will need to export. Click the “Download” button for the newly created archive and save it to the location of your choosing.

NOTE: The size of the export will vary on the configuration of your appliance. On this particular appliance, the export file size was 150MB.
At this point, the export process of your Mindbreeze appliance is now complete!
You can save this export for backup purposes or use it to import into another appliance. As mentioned, I will be importing this Snapshot into another appliance to demonstrate the ease of the migration process.
1. On the appliance that you wish to import this Snapshot, log into the Mindbreeze Management Center and go to the “Snapshot” page (same page as you did the export).
2. Within the “Snapshot Archives” section, click the “Upload Snapshot” button on the right-hand side.

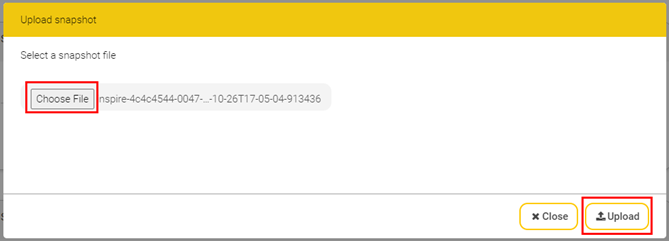
3. Click “Choose File” to select the appropriate Snapshot export and then click the “Upload” button.

4. Once it has uploaded, within the “Snapshot Archives” section, click the “Import” button.

5. On the confirmation pop-up page, click “Import” to confirm.

6. On the confirmation pop-up page, click “Apply.”

7. On the confirmation pop-up page, click “Apply.”

At this time, Mindbreeze will start importing the configuration within the Snapshot into the appliance. This will only take a few moments. The “Apply” button will also change slightly during this time. The arrow in the button will change to a spinning wheel while the Snapshot is being applied:
Once this changes back to the arrow, the import process is complete. If you now navigate to the “Configuration” page you should now see the Indices, Filters, Client Services, etc. that were part of the exporting system now on this new appliance.
While this Snapshot process is very helpful, it is also important to note a few things about this process:
- Verify your Snapshot migrated everything you needed
As with any migration, it is very important that you need to verify the migration was a success. For instance:- If you have files that reside outside of the main /data/resources directory (in the ‘inspire’ docker container), you might need to manually copy them over (see the documentation link below)
- Make sure your client services are running and available
- Verify the indices have crawled the number of documents that you are expecting
- This process does not move indexed documents
The Snapshots do not contain the index documents within your indices. Given that, once the indices start up, they will start crawling their configured data sources immediately as if this was a brand-new index. - Indices, Filters, and Client Services will retain their enabled/disabled state
When you generated the Snapshot, whatever status these had on the exporting system will be retained in that state on the new appliance. So shortly after importing the Snapshot, it’s very likely that indices will start crawling their data sources. - There might be a case for a manual migration or update of specific configurations
Here is a link to the Mindbreeze documentation that outlines which particular use cases might need a manual change in the configuration.
The manual updates are mainly centered around application specific configurations but be sure to read this portion of the documentation to make sure that you they do not pertain to you.
If you have any questions about the Mindbreeze Snapshot functionality or would like assistance with your migration process, please reach out to Fishbowl Solutions and we will be happy to assist you. If you’d like more information regarding Mindbreeze and its capabilities, visit our Mindbreeze services page, contact us via [email protected], or fill out the Contact Us form at the bottom of this page.


0 Comments